Link Within

Related Posts Plugin for WordPress, Blogger...

Friday, February 10, 2017

Valentine's Day Post-Cats in the Kitchen


Happy Friday!! 
I haven't posted anything on here for a long time. Fingers crossed* I'm planning to get back to blogging this year. I've been thinking about this post for a while and finally decided to actually do it. Yay! 

Displaying IMG_5881.JPG

I've been collecting vintage Valentine's for a while but my favorite ones to collect are cooking and baking themed ones for my kitchen, where most of my Valentine decorations are displayed. I've noticed there seemed to be a theme in some of my valentines throughout the decades: cooks and cats in the kitchen. I studied history and art history in college and so my way of looking at it was that someone started a theme and the following generations continued to use those themes, whether they did so consciously or not, and I wanted to explore that theme going back through the history of art.
Below are some of my vintage valentines with cooks and cats.


Below are some examples of depictions of cats in kitchens throughout history over the last 500 years. They often symbolize gluttony and chaos in medieval artworks. Later they embody mischief, snatching away fish when the kitchen hands aren't looking. Cats are also depicted as content or aloof. But anyone who knows cats knows they are capable of embodying all of the above within the space of an hour. Historically cats were kept near grain stores and kitchens to keep out vermin but I think the depiction of cats in the kitchen in the last 150 years has moved from the practical to 20th century domestic bliss. Cats are part of the family, one of the children. Which is how I feel they are depicted in the valentines above, kittens and children are so sweet together. You're not meant to associate them with Judas at the Last Supper. Egads! Symbolism is a powerful thing, luckily for us these associations have changed dramatically over the last 500 years. Enjoy!


The Last Supper; 1482 The Sistine Chapel Cosimo Rosselli
Judas is sometimes depicted on the opposite side of the table from Jesus and the disciples with a cat at his feet. This cat is fighting a dog over a bone, and winning. Cats were also depicted in portraits of Adam and Eve, symbolizing temptation.


Rich Kitchen; 16th Century 


Book of Hours; 1575 Da Costa
That is a content cat, keeping warm by the kitchen fire.


Parable of the Rich Man and Lazarus: 1610-1620 Peter Cornelisz Van Rijck
Spot the cat? Mischief Much?


Dutch painters often used cats to embody domestic bliss
1838, Henri Leys


The Cook and the Cat; 1860s, Theodore Augustine Ribot


Dutch girls series; Late 1800s, Edmond Louyot
Cats are more frequently depicted as domesticated companions moving into the 20th century.


Girl with a Kitten; Late 1800s; Emily Farmer


Displaying IMG_5280.JPG

Well I hope you've enjoyed this post. Gearing up for a Valentiney weekend. Have a great one!

Chelsea

Wednesday, August 17, 2016

My 1950s Kitchen Refab Project


Hello Friends!
I've been putting off this post, well posts in general, but I'm back! I've spent the last 6+ months fostering kittens so I've been very preoccupied and exhausted. I currently have 3 kittens sleeping somewhere around here. They are so cute but so much work. Hoping to get them placed soon and get back to normal, if there is such a thing.
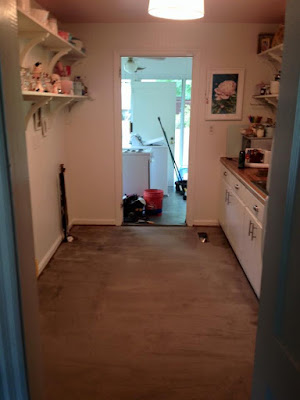
But! I'm here and ready to start sharing again! Tonight I'm sharing the journey of revamping my kitchen. This is what my kitchen looked like the day I saw it for the first time. I was a little overwhelmed by the work I saw but more so incredibly optimistic and excited about bringing it back to life. My house was built in the 1950's so 60 years of life have passed through this house, especially the kitchen. I'm only the second person to ever live here and that was a huge burden on me to make sure to respect this house and the period. Plus I wanted it to be a fun room! I spend so much time in the kitchen and even though it's the smallest room in my house whenever people come over we always end up all in this room at some point chatting and eating. I love my kitchen.


The before pics commence. The kitchen was just drab and sad feeling but so much potential. 


It took me about 4 months to even begin thinking about working on the kitchen. I had an idea of what I wanted but it took me forever to find just the right project materials. Before I did anything though I repainted the cabinets and replaced the hardware. That was fun (NOT). Some of those pulls were rusted so badly I had to saw them off. 60 years of kitchen grime and water running down from the sink. I found my pulls at Home Depot, Liberty Cup Pull & Liberty Steel Bar Pull. All cabinets and walls are Benjamin Moore White Dove.


Ain't she pretty! BTW That Magic Chef was vintage, vintage, vintage. Solid metal and had a gas leak. So I didn't use an oven for 6 months.


I found this paintable faux beadboard wallpaper at Lowes and painted it to match the cabinets. Also as you can see the ceiling is pink. I love the pink ceiling. I actually saw the paint color in the deck months before and thought the name was my favorite, Cats Meow. And then my mom saw it and said, "Well that is precious! You should paint the ceiling this color!" And so I did!


6 months after I bought my house, an oven! 


Before and after at the time. Already a transformation! And it stayed that way for another 6 months.
Then I finally found my inspiration fabric. This fabulous Romo Villa Nova pattern. It's part of their High Society collection, it's called Tea at the Ritz. 
My heart exploded. 


I designed this cornice and once it went up everything else fell into place.


I picked out this Congoleum confetti vinyl tile. Congoleum has been around for 130 years. It definitely had its most memorable time in the 50s and 60s. Check out these examples!


1931 Congoleum Vinyl "Rug"


 1945 Vinyl "Rug"

1960s Congoleum Vinyl. Woah!


Well my choice was a perfect match. It took me another year to get around to actually finding someone who could order and install it for me. But now it looks great!


There's the original 50s asbestos vinyl floor. It probably looked great with that big brown oven.


All covered up.


Brand new! Yay!
Oh I should take a minute to talk about the shelving. I knew I wanted open shelving. The kitchen is so tiny I wanted it to feel open and airy. I found these brackets at House of Antique Hardware. They weren't cheap but it's what I wanted. It was actually really difficult finding the perfect ones. They are very custom, thus the price, but it was worth the time and money in my book.


And we're back! Here's what it looks like now. Quite the transformation. I've still got things to do but it's been a fun project. 

This is on my ultimate dream list here: A pink Big Chill fridge
$$$$.$$


It's definitely on the "Someday" list but won't it be perfect!?!


Well I hope you've enjoyed this post and are inspired to get creative and take a leap of faith on your next project. 
See you soon!

xo, Chelsea

Friday, April 15, 2016

Hello Spring! Front porch refresh and DIY

Hi guys! It's been a while since I last posted but I'm going to just jump in here and start with a little transformation to get you excited about spring. Time for some spring cleaning and freshening up and what better place to start than your front door!

I've been in my first place for 3 years now. That is very hard to believe. It has definitely been a work in progress but I have loved seeing the transformations unfold.

Below is the first picture I took of my front porch. I had removed the old screen door and the mailbox and that's about it.


Then I made my door basket and found these great planter boxes at Target. Added Pencil Boxwood, white Angelina, and Golden Creeping Jenny. All from Pike Nurseries.


And here is what it looks like now. Last month I painted the concrete Benjamin Moore Embassy Green. I was tired of the weird stained concrete porch and wanted to freshen things up. Last year I pulled the mailbox back out of the attic and painted it bright red. It looks great now! My door is painted Benjamin Moore Calypso Blue. It took me forever to pick the perfect shade. I love how it turned out. Plus changing out the hardware was a huge improvement. 


I found this adorable doormat at Target this week. I have a small collection of doormats, I admit it! But I splurged on this cutie. Changed up the planters and added red geraniums and blue lithodora from Pike Nurseries. Ready for summer. Red, White, & Blue. Your entryway is the first thing you and your guests see. Make it fun and inviting! 


Even the smallest improvement can make a huge difference. What are your weekend home improvement plans!?!

Have a great one!
Chelsea


Wednesday, October 21, 2015

Happy Fall Ya'll! Autumn decor inspiration and some how-tos


 Hello everyone! As I was organizing and cleaning until 3am this morning as expected guests are now coming tomorrow instead of Sunday I realized I haven't been keeping up here, you know how those semi conscious thoughts come flowing in the exhausted wee hours. Soooo,  I'm officially working on some things! Last year mom stuck this little witch hat on Mr. Crow as a joke but I love it! So he's always up to no good. As is Lil Bit, below. Nothing but adorable trouble. My tablescape has changed since then but he thought he made a nice ornamentation. The orange pumpkins, above, I got on major sale a few years ago. They were metallic gold and I almost gave them away this year because I started to hate them but inspiration hit me when I realized I had some orange paint in my paint stash so I gave them a quickie glaze and voila! Orange pumpkins that I didn't have to rebuy!
                          
 
 With and without cat.
 
 
I've got a thing for vintage Halloween, anything really. Here is my kitchen shelf with some of my vintage collection. I found the Red Devil box mixed amongst some old nails and tools left from the original homeowner. The vintage Milky Way ad is from the 1950s by Ludwig Bemelmans, author and illustrator most famously for Madeline. So perfect!
Someday I would love to visit Bemelmans Bar at the Carlyle in NYC. He negotiated that he would do their murals for free in exchange for free rooms anytime he wanted. Check out some pictures here. So beautiful!


Turkey Pie anyone?
 
 I found this wonderful vintage repro deco poster at the thrift. I'm incredibly lucky!
 

I got these adorable little hooty owls from Magpie Ethel! I love all of her things, so much inspiration.
 
Trick or Treat. Adorable sign from Target.
 
                                      
I've been crafting away the last few weeks making holiday vignettes. I made this absolutely adorable haunted house. I was sad to see it go but I know they will love it! Spooooky!

So I wanted to share a little DIY project inspiration. This one is very easy if you have the nack. I found this vintage Menaboni print of two Evening Grosbeaks. I thought it was sweet and would look cute out during the holidays with the piney branch. The frame was worse for wear and unfortunately the print has water damage but for a few dollars worth it in my opinion. So home it went!
 

So first off I sanded the entire frame. There were some big gouges and overall scruffiness going on but since I was going to be painting I just wanted to smooth it out some. Nothing perfect. I had some green paint in my paint stash and made a chalkpaint mixture. Here is the thing about chalkpaint. It's not a perfect science in my opinion. There are many, many, many premade varieties on the market but I, personally, refuse to pay $30+ for a quart of paint that I could potentially make myself. Not everyone is that adventurous but I'm cheap baby. So here is the blend I generally start with:
1 cup latex paint
1.5 tablespoons tap water
2.5 tablespoons plaster of paris
 
Mix the water and POP well, we don't want lumps. Then add the paint. I generally use at least 3 or 4 tablespoons of POP. You'll need to test out your blend and see how it's looking, depending on how much of a chalky finish you want you'll want to add more than the 2.5 tbsp in the starter recipe.
 
So after I sanded my frame I painted it with my chalk paint. Chalk paint tends to dry pretty quickly and this was such a small project I waited maybe 30 minutes then I lightly sanded to distress and finished with some Restor-A-Finish in Walnut I had handy. This darkened it a bit, I wasn't crazy about how pastel it turned out, and it sealed in the paint finish. I found out about Restor-A-Finish when I redid my mid-century buffet earlier this year.
 

 And Voila! Finished product. I did actually end up completely taking the picture apart to look more closely at the matte and picture. There was still moisture under the glass!! :O So I cleaned it really well and put back together. I'll be tablescaping with this soon, winter is coming!

I enjoy seeing what everyone is doing with their own holiday décor. If you have suggestions for other great blogs or IG users please share. I'm heading to the Country Living Fair this weekend, anyone else attending? I love it!

Have a bright day!
Chelsea